Monday, May 7, 2012

The Family

I think one of the most important things about your wedding day is to honor the family that raised you and set the example of what marriage should be. Ryan and I are both blessed to come from families with great track records of successful marriages. I wanted to showcase this somehow, so I decided to set up family wedding pictures in the foyer of the church, with a picture of Ryan and me in the center. I haven't seen his family's set of pictures yet, but here are the ones I'm using.


On the left are my mom's parents, center are my parents, and right are my dad's parents. Both of my mom's parents as well as my dad's dad have passed away, so I'm really glad that in a small way they'll still be a part of my wedding day.

Another way I want to honor my family with pictures is to recreate some of my favorites from our parents' weddings. There's this great picture of my Grandma Sandra (doesn't she look like Audrey Hepburn in Roman Holiday?) in front of a mirror all dressed for her wedding. 


My mom (who wore the same dress) took one like it, too. I want to continue the tradition of the mirror picture on my wedding day, even though I'm quite a bit taller than either of them and therefore can't wear the same dress!


My favorite picture of Ryan's parents on their wedding day was taken in the car on the way to their reception. Don't they look happy and in love? I want a happy, cheek kissy picture too!


The Table runners

Get excited for another wedding project post!!!

I ordered some personalized beverage napkins from The Knot and decided to incorporate the design on them into the design for my table runners.

Unfortunately, I couldn't find the font they used for the K, so I went back to the website, made another napkin with the same K on it, only black with a white background this time, previewed the napkin, saved the preview image, cropped it so it cut out the rest of the napkin and I was just left with the K, blew that up, and printed it out. That sounds like it was a lot more complicated than it actually was. Anyway, as you can imagine (and also see because there's a picture!), my K was super pixely from all the enlarging, so I just went around the edges with a marker.


My mom then traced my pixely, markered K onto a sheet of plastic and used an X-Acto knife to cut out a stencil for me (This picture is after it's been tested once, because I didn't think to take pictures during the actual process. It's easier to see this way though.)


I'm using burlap for the table runners and some of the other decorations (which I'll also post pictures of once I figure out exactly what I'm doing and start working on them!), so we just ordered a big roll of it.


I wasn't exactly sure how the paint was going to work out on the burlap, so I tested it on a small piece, rather than messing up a whole table runner if it didn't turn out the way I wanted.


And voila! A nice clean, crisp K was waiting for me underneath the stencil! (Isn't pulling off a messy stencil to reveal the polished image underneath just about the most satisfying feeling?) I'm excited to start with the actual table runners!


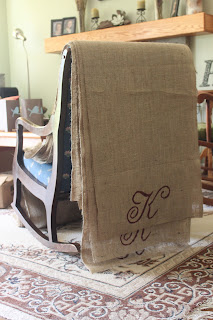
P.S. I thought I had this scheduled to post one day last week. Apparently I did not. The table runners are now done. Here's a picture of them chilling on the back of a rocking chair in my living room. To make them, I just cut out 7 ft pieces of burlap from my roll and stenciled my K on either end. Easy peasy!


Tuesday, May 1, 2012

The Garter

I was doing so well with wedding project posts and then I disappeared for a couple of months. :( I'm back now though, and just in time since my wedding is in 18 days!

For my garter, I knew I wanted something Mississippi State themed since that's where we met and started dating and got engaged and all that jazz. I started looking around online and didn't really see anything I liked. Also, garters are expensive! I mean really, it's just a piece of elastic with some decoration! And that's when it hit me: it's just a piece of elastic with some decoration... I have elastic... I can get decoration... DIY time!

I had a pair of State earrings that I never wear, so I took the hooks off and turned them into charms.


I found some lace that I really liked, but thought was a little too narrow, so I sewed two pieces together to give me a wider band.


Then I took some maroon ribbon (it looks a little red here, but I promise it's maroon!) and attached two pieces to my lace.


And for some reason after that, I apparently stopped taking pictures of my progress so I'll just have to explain the rest with some I took this morning. For the casing for the elastic, I just took another piece of lace and sewed it onto the back. It's hard to tell from this picture exactly what's going on, but I have my two pieces of lace sewn together to make it wider, and then one piece in the back sewn on either edge to hold the elastic, which I just threaded through my lace casing.

 I found some pearls with adhesive on the back in the scrapbook section of Hobby Lobby and I attached those along the line where my two pieces of ribbon met. The adhesive on the pearls ended up not being quite strong enough to keep them attached to lace, so I used a little hot glue. Then, I tied some ivory ribbon through the hole in the top of my charm and sewed it down.


I didn't want the garter to be too bunchy, but in order for it to be stretchy still, I left the two sides of the garter unattached at the back, and just sewed the elastic together. This made it pretty but not exactly ideal for flinging...


...so I made a second one that can be thrown at the reception. I was running low on lace at this point, so the second one is just two pieces sewn together with elastic in the middle, making it half the width of the original one. The pieces I used were longer though, so it's bunchier and more flingable. 


I really love the way they turned out and rather than spending $30+ ordering two garters I didn't like as much from someone else, I used stuff I already had and spent maybe $10 on lace, ribbon and pearls for two that I love and are completely custom. I call that a win!