Tuesday, July 31, 2012

Ingenuity

My parents have this table in their living room that they use for a computer desk. It's kind of funky looking with metal bars in an "X" shape for legs, and a glass top. It's an absolute perfect table when you need to trace something though. I had lamp with a clip that I'd attach to one of the metal bars and aim up at the glass and trace away. It was much easier to use than a little light table that my mom also has--a lot more surface space. I used it for quite a few wedding crafts.

Unfortunately, when I got married and moved to be with my husband, I also moved away from the glass top table. I've tried improvising a few ways. Our living room has two big sliding glass windows and I can successfully trace things by pressing the pages against the window, that is if I don't mind the backache that comes from drawing at an odd angle. I thought I'd found a better solution today when I took the glass out of a picture frame and kind of propped it up in my lap so that I could use the natural light in the room to light the back of my  paper. This worked fine until I pulled my stuff out after dinner when it started getting dark.

Enter my husband. He saw me struggling to sit backwards in the chair by the window to get light behind my glass and said, "I've got a better idea." He's big into fish tanks and had a spare light that he set upside down on the table for me. He grabbed two stacks of DVDs and put one on either side of the light and balanced my picture frame glass across it to make a table. Then he was worried that since the light is long and I'd only be using one end of it that the unused end would shine too brightly in my eyes, so he covered it with a magazine.


And voila! A light table was born.


 Then he played photographer while I was hard at work.


Behold--finished art and no backache!


I knew I married him for a reason. ;)
(Even if I do have to realphabetize my movies when I'm done)

Monday, June 25, 2012

I Do!

I have now been married for over a month and have yet to show you lovely people how all the stuff I made for my wedding turned out on the day of (not completely my fault though--we've been without internet until yesterday).  The week leading up to the wedding was incredibly chaotic, so I didn't get to post as much of the preparation process as I was intending, but here are a few pictures of how it all turned out:


I made these two wreaths for the front doors of the church by wrapping a strip of burlap around a styrofoam  wreath. I had a few silk orchids leftover from reception centerpieces that I decorated them with, and I used twine to attach letters that I found at Hobby Lobby and painted (with help from my groom--he did the R).


I made this sign by printing out the text on typing paper and just tracing the letters onto burlap with maroon paint. The top is folded over a dowel rod and it's hanging from more twine.


Here are those family wedding pictures I was so excited about. My family is the on the left, his is on the right, and the picture in the middle is him proposing.  The banner I made from triangles I cut out of burlap and painted. The quilt on the table was made by my mom's grandmother.


To decorate the pews, my mom made tons of burlap roses that we attached to streamers.


I found this arch at Hobby Lobby and it turned out to be the perfect size to hang a wedding ring pattern quilt that my dad's great grandmother made. The only other decorations at the front of the church were those massive ferns that a wonderful church member gave to us.


Here we all are, post ceremony.


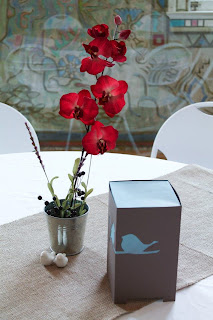
Now on to the reception.  My mom made all the paper lanterns, and I made the flower arrangements and the table runners.  The venue doesn't allow real flowers, unless they are done by a licensed florist, so I stocked up on silk orchids from Hobby Lobby (that store is a bride's best friend!). When the caterer was bringing in the centerpieces to set up, they almost didn't let her bring the flowers in because they thought they were real. I guess I did a good job picking life like ones!


 This is my bouquet. I loved it! The florist did such a good job! (I didn't trust myself with this one.) It's wrapped in a handkerchief that belonged to my great grandma (my something old) and pinned with a cameo that was also a great grandma's (my something blue).


Here's my beautiful and delicious cake. It was originally going to have real orchids on it, but the community center wouldn't let the caterer bring them in. Luckily she's amazing and always prepared and had some silk back ups.


This is the groom's table. His cake was a Mississippi State cowbell (also delicious). I made the flower arrangement by putting a block of floral foam in the bottom of a dog bowl and arranging the same flowers I used on the rest of the tables in it. The bowl was placed in the top of a vase that had dog bones at the bottom and a cowbell on top of them.


Here's a shot of that garter I made in action.


 And this is me with me handsome groom. 


 The whole day was perfect, and I had a blast. 

 Now I'm trying to figure out this whole marriage thing and enjoying each and every day with my wonderful husband.

Monday, May 7, 2012

The Family

I think one of the most important things about your wedding day is to honor the family that raised you and set the example of what marriage should be. Ryan and I are both blessed to come from families with great track records of successful marriages. I wanted to showcase this somehow, so I decided to set up family wedding pictures in the foyer of the church, with a picture of Ryan and me in the center. I haven't seen his family's set of pictures yet, but here are the ones I'm using.


On the left are my mom's parents, center are my parents, and right are my dad's parents. Both of my mom's parents as well as my dad's dad have passed away, so I'm really glad that in a small way they'll still be a part of my wedding day.

Another way I want to honor my family with pictures is to recreate some of my favorites from our parents' weddings. There's this great picture of my Grandma Sandra (doesn't she look like Audrey Hepburn in Roman Holiday?) in front of a mirror all dressed for her wedding. 


My mom (who wore the same dress) took one like it, too. I want to continue the tradition of the mirror picture on my wedding day, even though I'm quite a bit taller than either of them and therefore can't wear the same dress!


My favorite picture of Ryan's parents on their wedding day was taken in the car on the way to their reception. Don't they look happy and in love? I want a happy, cheek kissy picture too!


The Table runners

Get excited for another wedding project post!!!

I ordered some personalized beverage napkins from The Knot and decided to incorporate the design on them into the design for my table runners.

Unfortunately, I couldn't find the font they used for the K, so I went back to the website, made another napkin with the same K on it, only black with a white background this time, previewed the napkin, saved the preview image, cropped it so it cut out the rest of the napkin and I was just left with the K, blew that up, and printed it out. That sounds like it was a lot more complicated than it actually was. Anyway, as you can imagine (and also see because there's a picture!), my K was super pixely from all the enlarging, so I just went around the edges with a marker.


My mom then traced my pixely, markered K onto a sheet of plastic and used an X-Acto knife to cut out a stencil for me (This picture is after it's been tested once, because I didn't think to take pictures during the actual process. It's easier to see this way though.)


I'm using burlap for the table runners and some of the other decorations (which I'll also post pictures of once I figure out exactly what I'm doing and start working on them!), so we just ordered a big roll of it.


I wasn't exactly sure how the paint was going to work out on the burlap, so I tested it on a small piece, rather than messing up a whole table runner if it didn't turn out the way I wanted.


And voila! A nice clean, crisp K was waiting for me underneath the stencil! (Isn't pulling off a messy stencil to reveal the polished image underneath just about the most satisfying feeling?) I'm excited to start with the actual table runners!


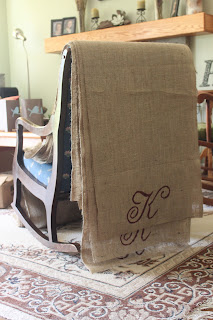
P.S. I thought I had this scheduled to post one day last week. Apparently I did not. The table runners are now done. Here's a picture of them chilling on the back of a rocking chair in my living room. To make them, I just cut out 7 ft pieces of burlap from my roll and stenciled my K on either end. Easy peasy!


Tuesday, May 1, 2012

The Garter

I was doing so well with wedding project posts and then I disappeared for a couple of months. :( I'm back now though, and just in time since my wedding is in 18 days!

For my garter, I knew I wanted something Mississippi State themed since that's where we met and started dating and got engaged and all that jazz. I started looking around online and didn't really see anything I liked. Also, garters are expensive! I mean really, it's just a piece of elastic with some decoration! And that's when it hit me: it's just a piece of elastic with some decoration... I have elastic... I can get decoration... DIY time!

I had a pair of State earrings that I never wear, so I took the hooks off and turned them into charms.


I found some lace that I really liked, but thought was a little too narrow, so I sewed two pieces together to give me a wider band.


Then I took some maroon ribbon (it looks a little red here, but I promise it's maroon!) and attached two pieces to my lace.


And for some reason after that, I apparently stopped taking pictures of my progress so I'll just have to explain the rest with some I took this morning. For the casing for the elastic, I just took another piece of lace and sewed it onto the back. It's hard to tell from this picture exactly what's going on, but I have my two pieces of lace sewn together to make it wider, and then one piece in the back sewn on either edge to hold the elastic, which I just threaded through my lace casing.

 I found some pearls with adhesive on the back in the scrapbook section of Hobby Lobby and I attached those along the line where my two pieces of ribbon met. The adhesive on the pearls ended up not being quite strong enough to keep them attached to lace, so I used a little hot glue. Then, I tied some ivory ribbon through the hole in the top of my charm and sewed it down.


I didn't want the garter to be too bunchy, but in order for it to be stretchy still, I left the two sides of the garter unattached at the back, and just sewed the elastic together. This made it pretty but not exactly ideal for flinging...


...so I made a second one that can be thrown at the reception. I was running low on lace at this point, so the second one is just two pieces sewn together with elastic in the middle, making it half the width of the original one. The pieces I used were longer though, so it's bunchier and more flingable. 


I really love the way they turned out and rather than spending $30+ ordering two garters I didn't like as much from someone else, I used stuff I already had and spent maybe $10 on lace, ribbon and pearls for two that I love and are completely custom. I call that a win!

Sunday, February 26, 2012

The Invitations

Ryan and I were wandering around in Michael's one day (How lucky am I that my fiance will peruse craft stores with me?) and I saw a wedding invitation kit that I really liked. I decided to hold off getting it in case I saw something I liked better elsewhere. This was probably a mistake. If there's one thing I've learned from the planning process, shopping around on everything is not entirely necessary. The more options you have, the more confused you tend to get. If you see something that you like, your fiance likes, and whoever is paying for the wedding is okay with the price, just get it. Save yourself headache and stop looking. By the time I decided that I wanted to go with those invitations, my local Michael's store didn't have any. I found the spot on the shelf that they were supposed to go, but that's it. I looked up store locations and realized that there was another one not far from the one that had failed me. I drove there and managed to find four boxes of them by digging around behind another style that was shelved wrong. I needed five boxes, but I went ahead and bought the four, then convinced Ryan, who has to drive by 2 other Michael's stores on his way home from work, to go by them in search of one more box. He managed to get the very last one in the store! (I knew I was marrying him for a reason.)

Once I had the supplies, then came the fun part--wrestling with my printer again. I figured that after all the issues I had doing save the dates that surely they would all be smoothed out and printing invitations would be a breeze. Wrong. Somehow the driver had deleted itself from my computer, so it wouldn't recognize the printer when I plugged it in. I tried using my mom's computer instead, but she has Open Office instead of Microsoft Word, so the template wouldn't translate. I managed to download a new driver after much searching, and eventually got the invitations and RSVP cards all printed.


Then I stuck address labels that my lovely mother made on the RSVP card envelopes.


And assembled everything in the cute little folders the kit came with.


And tied what felt like a billion little pieces of string around each folder, so they can be stuffed in envelopes and put in the mail.


It's a tedious process, but I love how they turned out! I can't wait for guests to start getting them!

Wednesday, January 25, 2012

The Save the Dates

I like to be crafty so when it came to save the dates, I really wanted to do them myself. Also, I understand that people get tons of stuff in the mail everyday, and anything I sent could be easily lost. Ryan and I thought that magnets would be a good idea (easier to keep up with it--just stick it to the fridge!), but I still wanted to do it myself, so I looked around and found a DIY magnet kit online. I came up with a design, playing off of my bridesmaid cards (Ryan's suggestion of playing off of his groomsmen invites was vetoed), drew it, scanned it, and followed the instructions that came with the kit to format our magnets. The kit came with a test sheet, so I ran that through the printer. It looked great, so I moved on to the first magnet. The design was out of place by an inch or two, causing the bottom to be completely cut off. Apparently magnets don't go through a printer the same way that paper does. I adjusted the design down and tried again, but now the printer's ink was running out. I changed the cartridge and for some reason it didn't align properly, so on the next magnet I tried, the placement was good but the picture was printed twice, like how 3D looks when you don't have on the glasses. After trial run after trial run after trial run and what seemed like hours and hours and hours of frustration, I finally figured out a system that worked. I definitely put the whole "If at first you don't succeed, try, try again" thing to work. Only with about 20 billion more tries in there. I ended up loving the result though, so it paid off!